Integrating external cameras in Vuforia UWP apps
I recently had the chance to work on an interesting and challenging project. I didn’t expect to encounter so many roadblocks though, that’s why I would like to share some learnings.
The team behind the aforementioned project were in the middle of creating an interactive installation for a museum. They wanted visitors to be able to place certain items on on a desk and project contextual information depending on where the item was placed. Naturally, they used Vuforia to do the tracking. There was just a tiny problem: Vuforia couldn’t connect to the camera.
Down the rabbit hole
Here’s the setup: the camera is an industrial-grade infrared camera from Allied Vision. Its primary output format is Mono8, where each pixel takes up 8 bits. If you need more precision, the camera also supports Mono10 and Mono12, where each pixel gets 10 or 12 bits respectively. Since it’s an infrared camera this makes perfectly sense: you don’t need to account for color channels. As you can see below, rendering infrared, or intensity-based data in general, results in a grayscale image.
Source: Wikipedia
Sadly, Vuforia only supports common video formats meant to contain color, like RGB24 or YUYV, out of the box. And as we just discovered, Mono8 isn’t one of them. Fortunately, Vuforia allows developers to hook into the frame capture process by writing a “Custom Driver”. You can learn more about the External Camera feature in their excellent documentation.
For now, my plan of attack was to write a driver. The target device was a Windows 10 machine, so this driver had to be implemented using Universal Windows Platform (UWP) APIs.
The pool of tears
Using the MediaCapture API, more specifically the MediaFrameReader, we can stream all sorts of camera data in UWP apps. In theory, you would get all possible camera sources with MediaFrameSourceGroup.FindAllAsync(), filter out the appropriate camera and the desired source kind, in my case MediaFrameSourceKind.Infrared, initialize a MediaCapture object, then create and start the MediaFrameReader object.
I already had some experience using this API because of a side project, where I tried to create my own Vuforia driver for UWP. So, I used the existing code in the hopes of it “just working”. It was at this point that I noticed that the camera refused to show up in any API calls. To see exactly why, I have to go a bit on a tangent:
Apparently, a manufacturer has to provide a special kind of capture driver, also known as a Device Media Foundation transform (MFT). The MFT uses various attributes to let Windows know what kind of functionality a camera device supports. Windows is then able to let apps access this functionality in a secure manner through the likes of MediaCapture. This might be the reason most Virtual Webcam solutions won’t work with UWP. OBS, for example, only provides a DirectShow output. My camera was, as far as Windows was concerned, just a generic USB device. MFT is a powerful framework, but also very complex. With my non-existent experience in this field I couldn’t estimate the overall time and effort necessary to implement a reliable solution. Not particularly reassuring with a deadline around the corner.
Next idea: I tried to use the manufacturers SDK directly within the Vuforia custom driver and ended up generating a lot of exceptions, but not a single frame. The SDK was using a lot of APIs to connect to the camera that simply aren’t allowed with UWP apps. I’m almost certain the underlying Boost libraries were the root cause in this case.
The sensible thing to do in this situation is, of course, to panic. Here I was without a way to access the camera in my UWP app, despite all the extension points of Vuforia. If I just could write a regular application without security restrictions, one that can do whatever I want it to do…
A mad tea party
Incidentally, Microsoft realized this issue over two years ago and resolved it by introducing the UWP Desktop Bridge. The desktop bridge enables developers to combine traditional desktop apps (“Win32 apps”) and new UWP apps in various ways.
The desktop bridge is exactly what I needed. The solution to my problem wouldn’t have been possible without it.
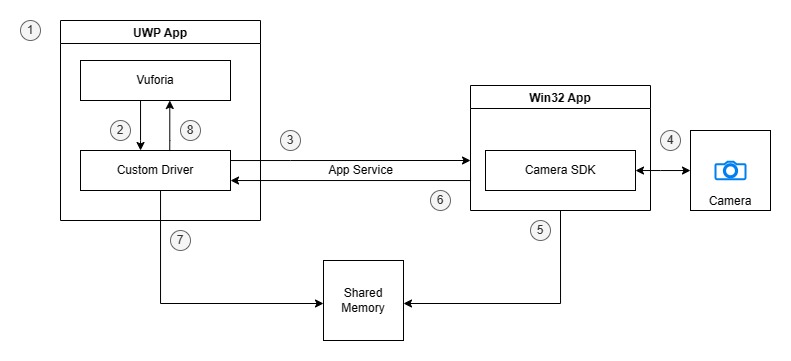
Here’s how everything comes together:

- the UWP host app invokes Vuforia
- Vuforia loads the driver and calls lifecycle methods of the driver framework
- the driver sends requests to the Win32 process via app service connection
- the Win32 process handles requests and uses the manufacturers SDK to talk to the camera
- the converted camera frames are stored in shared memory (if the camera is running)
- the Win32 process sends responses via app service connection
- the driver reads camera frames from shared memory (if the camera is running)
- the driver responds to Vuforia
Following this architecture, the two components I had to implement were the custom driver for Vuforia, which is running inside the UWP host, and a Win32 app. You can think of the UWP driver as client and the Win32 app as server: the client sends commands from Vuforia to the server, the server processes the request and sends back a response. Since both Vuforia and the camera SDK use C++ I decided to follow suit. This is where the last piece of the puzzle comes into play.
In addition to the desktop bridge, Microsoft also created C++/WinRT, a language projection for the Windows Runtime to be able to access all the UWP APIs from standard C++. To quote the documentation:
“[C++/WinRT] is for any developer interested in writing beautiful and fast code for Windows”
Consuming the Windows Runtime APIs this way is actually pleasant. So pleasant in fact, that I recently ported my Vuforia UWP Driver on GitHub from the rather awkward C++/CX to C++/WinRT.
Initial setup
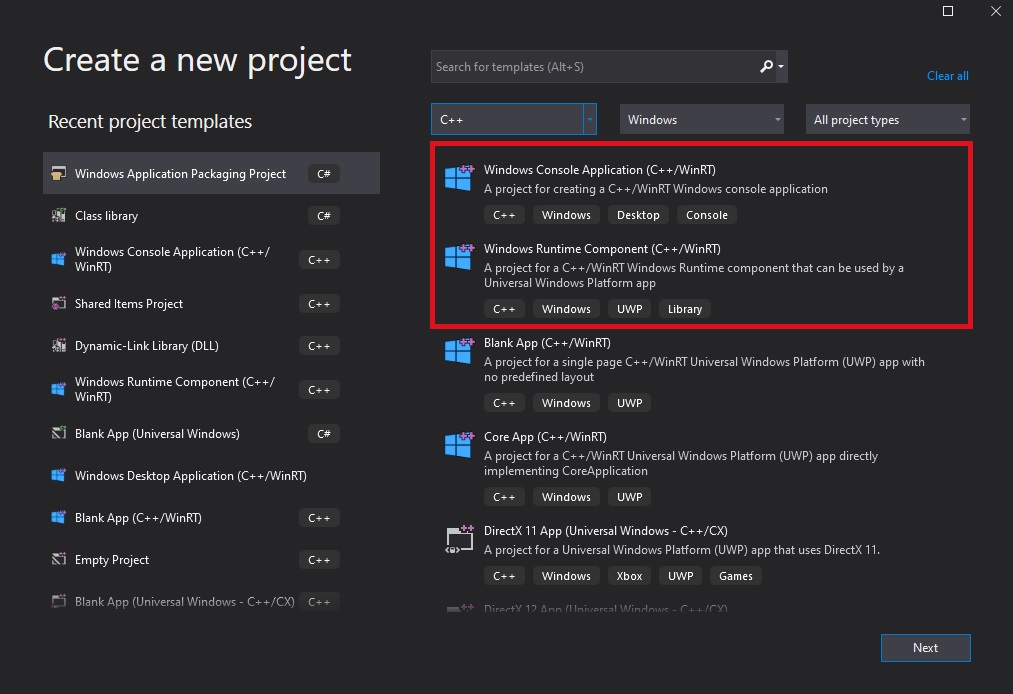
I’m using the Windows Runtime Component template for the driver and the Windows Console Application template for the server:

Tip: use the Shared Items Project in Visual Studio for common files that are used by the server as well as the client.
Before diving into the actual code though, we have to edit the Package.appxmanifest of the host application. Also, some changes we’ll make to the manifest are not supported by the Visual Studio UI, so we’ll have to edit the XML manually.
First, we need to register a fullTrustProcess extension to be able to launch the server executable (the .exe of the console project) and an appService extension for the communication between driver and server. Make sure to include the executable, and its dependencies, in your project, otherwise your app won’t be able to run it.
We also need two additional capabilities: codeGeneration and runFullTrust:
<!-- don't forget to include XML namespaces
for "desktop" and "rescap" in the root node -->

<Extensions>
    <desktop:Extension  Category="windows.fullTrustProcess" Executable="Server.exe" />
    <uap:Extension Category="windows.appService">
        <uap:AppService Name="ServerService" />
    </uap:Extension>
</Extensions>

<Capabilities>
    <Capability Name="codeGeneration"/>
    <rescap:Capability Name="runFullTrust" />
</Capabilities>
Client / Server communication
To launch the server process from within driver, we can use the FullTrustProcessLauncher API. In this case, the server will initiate the app service connection after its launch, so we’re also registering appropriate event handlers.
// listen to the activation of an app service and launch Win32 process
void Driver::LaunchServer()
{
    CoreApplication::BackgroundActivated({ this, &Driver::OnBackgroundActivated });
    FullTrustProcessLauncher::LaunchFullTrustProcessForCurrentAppAsync();
}

// store app service connection object
void Driver::OnBackgroundActivated(IInspectable const&, BackgroundActivatedEventArgs const& e)
{
    auto details = e.TaskInstance().TriggerDetails().as<AppServiceTriggerDetails>();
    m_connection = details.AppServiceConnection();
}
I’m using app service as transport, because it’s flexible and easy to use. The OS handles pretty much everything for us.
To initiate the app connection from the server we just have to provide the package family name and the name of the app service.
The family package name matches the family name of the app that deployed the EXE. The app service name has to match the name specified in Package.appxmanifest.
Right after the app service object is set up, the server will send a special message to the driver to confirm a successful launch.
void Server::PrepareAppServiceConnection()
{
    m_connection = AppServiceConnection();
    m_connection.PackageFamilyName(Package::Current().Id().FamilyName());
    m_connection.AppServiceName(L"ServerService");
    m_connection.RequestReceived({ this, &Server::OnAppServiceRequest });

    // send an initial message to confirm launch...
    auto message = ValueSet();
    message.Insert(L"LAUNCH", L"SUCCESS");
    m_connection.SendMessageAsync(message);
}
Back on the driver side we can use the connection object to communicate with the server process. For example, if we wanted to command the server to start the camera when Vuforia wants it, we might write the following code in the driver:
bool VUFORIA_DRIVER_CALLING_CONVENTION start(VuforiaDriver::CameraMode, VuforiaDriver::CameraCallback* cb)
{
    // store camera mode and camera callback
    //...

    // send request to open the camera
    auto message = ValueSet();
    message.Insert(L"COMMAND", L"START");
    //  ... insert more data ...

    // wait for response (blocking)
    auto response = m_connection.SendMessageAsync(message).get();

    // parse response
    return IsSuccess(response);
}
You can put in any key-value pair in ValueSet, as long as its a supported WinRT type. I’ve decided to always send the key COMMAND with a value indicating which command it is. In this case the command “START” means “start the camera”. On the other end the server is able to look up the command:
void Server::OnAppServiceRequest(AppServiceConnection const&, AppServiceRequestReceivedEventArgs const& args)
{
    auto deferral = args.GetDeferral();
    auto command = message.TryLookup(L"COMMAND");

    // handle command (e.g. start camera)
}
You could use the app service to model a much more complicated contract between client and server.
When it comes to delivering the frames though, we have to take another approach.
I’m using a camera that is able to deliver a whopping 120fps of high resolution image data, thats roughly 1-2MB every 8ms. Transferring that much data can be really expensive, especially when running all day long with other programs eating CPU resources as well.
For this part I decided to use the fastest interprocess communication technique there is: shared memory.
Shared memory
Shared memory is memory that may be accessed by multiple apps simultaneously. Most operating systems also allow the creation of named shared memory, where you give the memory a fixed name. This simplifies access from another app, since all you need is a string representation of the name you chose. I’m using named shared memory to transfer the camera frames between client and server without noticeable overhead.
Creating or opening shared memory in UWP is pretty simple. The other way around is…a bit complicated. Sadly, I didn’t know that at this point in time, so I tried to create the mapping from the Win32 side. Turns out you have to create the mapping with very specific security attributes to be able to access it on the UWP side. Luckily, I found this sample code for creating a named object that’s accessible for UWP apps. I can’t recommend to do it this way, but it works and I’m leaving it as tribute to the dev who wrote the helpful sample code.
The code in question actually creates a named mutex, but switching the flags to the ones for file mappings worked. Simply change the EXPLICIT_ACCESS fields like so:
// ... instead of
// ea[0].grfAccessMode = SET_ACCESS;
// ea[0].grfAccessPermissions = STANDARD_RIGHTS_ALL | MUTEX_ALL_ACCESS;

// use:
ea[0].grfAccessMode = GRANT_ACCESS;
ea[0].grfAccessPermissions = STANDARD_RIGHTS_ALL | FILE_ALL_ACCESS;

// don't forget to change ea[1] too...
Then create the memory mapping (error handling omitted for brevity):
void Server::CreateSharedMemory(std::wstring name, unsigned long size)
{
    SECURITY_ATTRIBUTES securityAttributes;
    SetSecurityAttributes(securityAttributes);   // use sample code to set attributes

    m_mappingHandle = CreateFileMapping(
        INVALID_HANDLE_VALUE,
        &securityAttributes,
        PAGE_READWRITE,
        0,
        size,
        name.c_str());

    m_buffer = MapViewOfFile(
        m_mappingHandle,
        FILE_MAP_ALL_ACCESS,
        0,
        0,
        size);
}
As I mentioned, using it from UWP is easy :
void Driver::OpenSharedMemory(std::wstring name, unsigned long size)
{
    m_mappingHandle = OpenFileMapping(
        FILE_MAP_ALL_ACCESS,
        FALSE,
        name.c_str());

    m_buffer = MapViewOfFile(
        m_mappingHandle,
        FILE_MAP_WRITE,
        0,
        0,
        size);
}
Ringbuffer
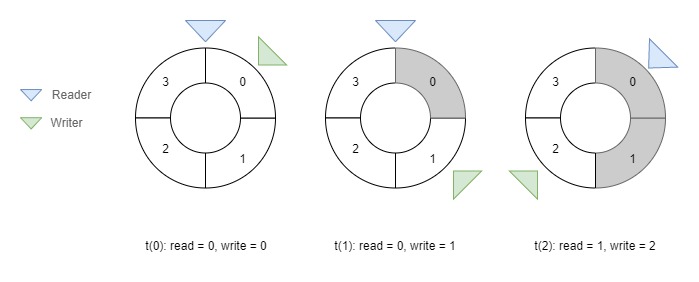
Of course you can’t just drop a block of memory in on one end and expect the other side to always read it in time. I’m using a fixed-size ringbuffer to coordinate the reads and writes inside the shared memory. The structure of a (naive) ringbuffer is quite easy to explain: there’s a write index, a read index and some memory divided into equal-sized slots.
Once the camera produces a frame, the server converts it to a common format and writes directly into a free buffer slot. The server then increments the write index and moves on. If there’s no free slot the frame is skipped.
Processing on the client side is done by getting a pointer to a slot and calling the Vuforia Engine with a pointer to the frame data. There’s no unnecessary copying involved, which makes this very fast. Once Vuforia is done processing the client increments its read index and moves on as well.

The nice thing about this lock-free implementation is that, at least in theory, both client and server can process at their own pace. Of course, the implementation described below is only applicable for a single producer and a single consumer. There far more sophisticated solutions out there for multi-producer or multi-consumer setups.
With that being said, here is a simplification of the structures of the ringbuffer to demonstrate the general idea:
struct Frame {
    uint64_t timestamp;
    unsigned char data[MAX_FRAME_SIZE];
};

template <typename T, unsigned int Capacity>
struct RingBuffer {
    int readIndex;
    int writeIndex;

    T items[Capacity];
};

typedef RingBuffer<Frame, 4> FrameRingBuffer;
In this case FrameRingBuffer would be a fixed-size buffer with four slots for frames. Each slot would contain a Frame structure that consists of a timestamp and the raw frame data. As long as you’re not using structures that rely on pointers inside the shared memory, you’re free to put in whatever you want.
The following code snippet demonstrates how a client could access the latest slot:
auto const currentRead = buffer.readIndex;

// handle slow producer / empty buffer
if (currentRead == buffer.writeIndex) {
    return;
}

// get a pointer to the slot
T* pSlot = &(buffer.items[currentRead]);
The end
In the end, all the research and testing was worth it. The important thing for me is that the team was able to use the approach described in this article and deliver on time.
I learned a lot about low-level interprocess communication during this project, and also how rusty my C++ is. I hope this post helps anyone interested in undertaking a similar endeavour.